How to Clean a Dryer Vent: Signs, Steps, and When to Call a Pro
Learn how to identify dryer vent problems, safely clean the accessible exhaust system, check airflow, prevent lint buildup, and know when professional service is needed.
 By Ethan Parker
In this article
- How Do You Know Your Dryer Vent Needs Cleaning?
- The Lint Filter Is Not the Same as the Dryer Vent
- What to Do Before Cleaning a Dryer Vent
- Turn the dryer off and disconnect power
- Get help moving the dryer
- Gather the right tools
- How to Clean a Dryer Vent Step by Step
- 1. Locate the dryer exhaust connection
- 2. Disconnect the exhaust duct
- 3. Remove accessible lint by hand
- 4. Clean the dryer-side vent opening
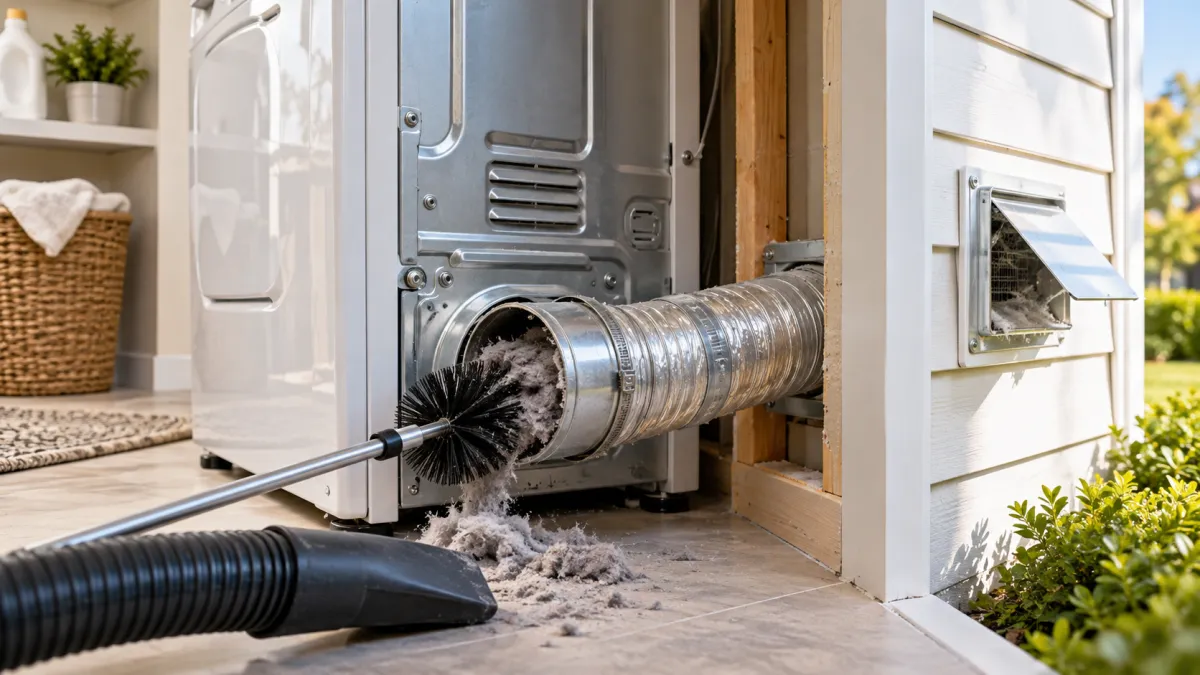
- 5. Clean the accessible exhaust duct
- 6. Check the exterior vent
- 7. Inspect the duct for damage
- 8. Reconnect the exhaust duct securely
- 9. Restore the dryer according to the manufacturer's instructions
- 10. Check the dryer and exterior airflow
- How to Clean a Dryer Vent From Outside
- How Often Should You Clean a Dryer Vent?
- Dryer Vent Safety: When Cleaning Is Not Enough
- Gas Dryer vs. Electric Dryer: What Changes?
- Not Every Dryer Uses the Same Venting System
- What to Check Behind the Dryer
- Crushed ducting
- Sharp bends
- Loose connections
- Damaged duct material
- Excessive lint
- Common Dryer Vent Cleaning Mistakes
- Cleaning only the lint screen
- Cleaning only the first few inches of duct
- Ignoring the outside vent
- Pushing the dryer back too far
- Using damaged or unsuitable ducting
- Ignoring slow drying after cleaning
- Working on a gas connection without the proper expertise
- Forgetting to reconnect the exhaust duct
- When Should You Call a Professional?
- How to Prevent Dryer Vent Buildup
- A Simple Dryer Vent Cleaning Checklist
- Conclusion
A dryer that takes longer than usual to dry clothes may have more than a simple appliance problem. Lint can accumulate in the exhaust path, restricting airflow between the dryer and the outside vent. A clogged or restricted vent can reduce drying performance and create a safety concern.
Cleaning a dryer vent involves more than removing the lint screen. You need to check the exhaust connection behind the dryer, clear accessible lint from the duct, inspect the exterior vent, and make sure airflow is restored before returning the dryer to normal use.
The basic process is straightforward: disconnect the dryer safely, access the exhaust duct, remove lint and debris, clean the exterior vent, inspect the duct for damage or restrictions, reconnect everything securely, and check the airflow. The exact procedure can vary by dryer model, so the owner's manual should take priority over general instructions.
How Do You Know Your Dryer Vent Needs Cleaning?
The most obvious warning sign is a change in drying performance. If clothes that normally dry in one cycle are suddenly taking much longer, the dryer may not be exhausting air properly.
Common signs include:
-
Clothes remain damp at the end of a normal cycle.
-
Drying cycles take noticeably longer than they used to.
-
The dryer or laundry area feels unusually hot.
-
Airflow at the outside vent appears weak.
-
The exterior vent flap does not open properly while the dryer is running.
-
Lint or debris is visible around the exterior vent.
-
The dryer displays a vent-restriction warning on models equipped with that feature.
-
You notice a burning or unusual odor and cannot identify the cause.
A slow dryer does not automatically prove that the exhaust duct is clogged. A dirty lint screen, crushed duct, damaged venting, appliance problem, overloaded dryer, or another airflow restriction can produce similar symptoms.
That is why the most useful approach is to diagnose first and clean second.
The National Fire Protection Association recommends cleaning the lint filter before or after each use and checking that the exhaust path is not restricted. It also recommends cleaning the vent pipe once a year, with attention to signs such as longer drying times.
The Lint Filter Is Not the Same as the Dryer Vent
One of the most common maintenance mistakes is treating the lint screen and exhaust vent as the same thing.
They are not.
The lint filter or lint screen is the removable screen inside or near the dryer opening that catches lint from clothes. It should be cleaned regularly, typically after every load.
The dryer vent or exhaust system is the pathway that carries warm, moist air from the dryer toward the exterior of the home in a conventional vented dryer.
Lint can get past the screen and accumulate farther along this exhaust path. That means a clean lint screen does not necessarily mean the entire vent system is clean.
Think of the system as a pathway:
Dryer → rear exhaust connection → duct → exterior wall or roof termination → outside
A restriction anywhere along that path can reduce airflow.
This distinction is important because cleaning only the lint screen will not solve a blockage farther inside the exhaust duct.
What to Do Before Cleaning a Dryer Vent
Before disconnecting anything, check the owner's manual for your specific dryer. Manufacturers can have model-specific instructions for maintenance, access points, and safety procedures.
Then prepare the work area.
Turn the dryer off and disconnect power
Unplug an electric dryer before moving or servicing it.
For a gas dryer, additional precautions apply because the appliance is connected to a gas supply. Do not attempt gas-line repair, modification, or other work outside your ability. If the gas connection needs to be disconnected or appears damaged, use the manufacturer's instructions or a qualified professional.
Also make sure the dryer is cool before beginning.
Get help moving the dryer
Dryers can be heavy and awkward to move. If the appliance needs to be pulled away from the wall, having another person help can reduce the risk of injury or damage.
You generally need enough space to access the exhaust connection without sharply bending or crushing the duct.
Gather the right tools
For a basic cleaning, you may need:
-
Dryer vent cleaning brush or cleaning kit
-
Vacuum with a hose or crevice attachment
-
Screwdriver if required for the connection
-
Work gloves
-
Flashlight
-
A cloth for collecting loose lint
A purpose-built dryer vent brush is useful because it can reach farther into accessible duct sections than a normal household brush.
A vacuum helps remove loosened lint rather than simply pushing it farther into the duct.
How to Clean a Dryer Vent Step by Step
The goal is to clear the accessible exhaust path without damaging the duct or creating another restriction.
1. Locate the dryer exhaust connection
Pull the dryer far enough away from the wall to see the exhaust connection on the back.
Do not pull aggressively if the duct is tight or the appliance is difficult to move.
Look for signs of trouble such as:
-
Crushed or kinked ducting
-
Loose connections
-
Visible lint accumulation
-
Damaged duct material
-
Excessive bends or sagging
-
A connection that has separated from the wall or dryer
A crushed duct deserves attention because cleaning alone will not correct the underlying airflow problem.
2. Disconnect the exhaust duct
Once the dryer is safely disconnected and accessible, detach the exhaust duct from the back of the dryer according to the manufacturer's instructions.
Some connections use clamps or other fastening methods.
Do not force a connection that you cannot safely remove. If accessing the connection requires dismantling parts of the dryer or disturbing a gas connection, professional help may be appropriate.
3. Remove accessible lint by hand
Start with the lint that you can safely reach.
Use your hand or a suitable tool to remove larger accumulations around the dryer exhaust opening and the accessible end of the duct.
Avoid pushing a large mass of lint deeper into the vent.
This first pass makes it easier for the brush and vacuum to remove the remaining material.
4. Clean the dryer-side vent opening
Insert the dryer vent brush gently into the accessible exhaust opening.
Move it carefully through the opening rather than forcing it against resistance. Depending on the configuration, you may be able to reach part of the duct from the dryer side.
A vacuum hose can then be used to collect loosened lint and dust.
Do not use a tool aggressively enough to puncture or damage the duct.
5. Clean the accessible exhaust duct
Use the dryer vent brush to loosen lint inside the accessible duct sections.
If the duct is detachable and the manufacturer's instructions allow it, cleaning from both ends can provide better access.
A vacuum can collect loose material after brushing.
The objective is not simply to make the first few inches look clean. You want to identify whether lint is accumulating farther along the exhaust path.
For a long, concealed, inaccessible, or unusually configured vent run, a professional cleaning may be more appropriate than trying to reach the entire system with a household brush.
6. Check the exterior vent
Go outside and locate the dryer exhaust termination.
Depending on the home, it may be on an exterior wall or another approved termination location.
Inspect the vent opening for:
-
Lint
-
Dust
-
Leaves
-
Insect nests
-
Other debris
-
A flap that cannot move freely
Remove accessible debris carefully.
The exterior termination should allow exhaust air to leave the home without an obvious obstruction. NFPA guidance recommends checking that the outdoor vent flap opens during dryer operation.
7. Inspect the duct for damage
Cleaning is also an opportunity to inspect the venting itself.
Look for a duct that is:
-
Crushed
-
Kinked
-
Sagging
-
Torn
-
Disconnected
-
Improperly joined
-
Made from unsuitable material
The U.S. Department of Energy's dryer-venting guidance emphasizes rigid or semi-rigid sheet-metal venting, keeping the run as short and straight as practical, preventing bends or sagging, and using an appropriate exterior termination.
If the existing duct is damaged or unsuitable, replacing it may be more important than simply cleaning it.
Do not assume that an old duct is acceptable just because the dryer still operates.
8. Reconnect the exhaust duct securely
After cleaning and inspection, reconnect the duct to the dryer and the wall connection.
Make sure the connection is secure and that the duct is not crushed when the dryer is moved back.
The duct should not be sharply bent behind the dryer.
A clean duct can still have poor airflow if it becomes compressed when the appliance is pushed against the wall.
9. Restore the dryer according to the manufacturer's instructions
Once the exhaust connection is secure, restore power according to the dryer manufacturer's instructions.
If you have a gas dryer, do not improvise with the gas connection. Any uncertainty about the gas supply or connection is a reason to use qualified professional help.
Before returning the dryer to regular use, make sure all connections are secure.
10. Check the dryer and exterior airflow
Run the dryer according to the manufacturer's recommended testing procedure.
While it is operating, check the exterior exhaust termination if it is safely accessible.
You should be able to observe exhaust airflow and movement of the vent flap on a conventional vented dryer.
If airflow remains weak after cleaning, do not assume that the job failed simply because more brushing is needed. The problem could be farther inside the vent system, involve the duct configuration, or originate with the appliance itself.
How to Clean a Dryer Vent From Outside
Cleaning from outside can help remove lint and debris near the exterior termination, but it may not provide access to the entire exhaust system.
If you cannot safely move the dryer, the exterior vent is still worth inspecting.
Start by checking the exterior opening for visible lint, debris, nests, or other obstructions. Remove accessible debris and use an appropriate vent-cleaning brush or vacuum where the configuration allows.
However, exterior-only cleaning has an important limitation: you may not be able to see or reach restrictions closer to the dryer or inside concealed sections of the duct.
For that reason, cleaning from outside should not automatically be treated as a complete replacement for inspecting the dryer-side connection.
If the dryer continues to take too long to dry after exterior cleaning, the remaining vent path should be investigated.
How Often Should You Clean a Dryer Vent?
There is not one universal schedule that applies to every household.
NFPA guidance recommends cleaning the vent pipe once a year and paying attention to changes such as longer drying times.
Some manufacturers provide different maintenance intervals. For example, Maytag advises thorough cleaning of the ventilation system at least every two years while noting that frequency can vary with dryer use and clogging.
That difference is why your dryer owner's manual matters.
A practical approach is:
| Situation | What to do |
|---|---|
| Every load | Clean the lint screen |
| Drying time becomes noticeably longer | Inspect the lint screen and exhaust path |
| About annually | Inspect and clean the vent system as appropriate |
| Heavy dryer use or recurring lint buildup | Consider more frequent inspection |
| Vent restriction or poor airflow | Address the problem rather than waiting for a calendar date |
| Manufacturer provides a different schedule | Follow the manufacturer's instructions |
The important point is not to treat a calendar interval as a guarantee that the vent is clean.
A vent that becomes restricted sooner needs attention sooner.
Dryer Vent Safety: When Cleaning Is Not Enough
Sometimes the safest decision is to stop trying to solve the problem with routine cleaning.
Pay particular attention if you notice:
-
Burning odors
-
Excessive heat
-
Persistent poor airflow
-
A visibly damaged or crushed duct
-
A disconnected exhaust connection
-
A blockage that you cannot safely reach
-
A vent path that disappears into an inaccessible area
-
Repeated vent-restriction warnings
-
A gas connection that appears damaged or questionable
If you suspect a serious restriction or another unsafe condition, follow the manufacturer's instructions and consider professional service rather than repeatedly running the dryer to see whether the problem improves.
Cleaning should restore a safe, functional exhaust path—not become a substitute for repairing damaged equipment.
Gas Dryer vs. Electric Dryer: What Changes?
The basic exhaust-cleaning concept is similar for gas and electric dryers, but a gas dryer introduces an additional safety consideration: the gas connection.
For an electric dryer, disconnecting the electrical power is the primary preparation step before accessing the exhaust system.
A gas dryer also has a gas supply connection. General vent cleaning should not turn into an improvised gas-line project.
If you need to disconnect, modify, repair, or troubleshoot the gas connection and you are not qualified to do so, stop and use an appropriate professional.
The dryer owner's manual should also be consulted before maintenance.
The key distinction is simple:
Cleaning the exhaust path is routine maintenance. Gas-line work is a separate safety issue.
Do not confuse the two.
Not Every Dryer Uses the Same Venting System
Conventional vented dryers exhaust warm, moist air through a duct that terminates outside the home.
Ventless or condensing dryers work differently and should be maintained according to their manufacturer's instructions. The U.S. Department of Energy notes that dryer venting requirements differ for condensing or ductless dryers.
Before following a conventional dryer-vent cleaning procedure, identify what type of dryer you have.
If your dryer does not have a conventional exhaust duct leading outdoors, do not assume that the standard procedure applies.
What to Check Behind the Dryer
The area behind the appliance deserves attention because it can reveal problems that are easy to miss during normal use.
Look for:
Crushed ducting
If the dryer is pushed too close to the wall, the exhaust duct can become compressed.
Sharp bends
A complicated duct path can interfere with airflow and make lint accumulation more likely.
Loose connections
A disconnected or poorly secured duct can allow lint and moist air to escape where they should not.
Damaged duct material
Tears, holes, severe deformation, or unsuitable materials may require replacement rather than cleaning.
Excessive lint
Heavy lint accumulation near the connection is a reason to inspect farther along the exhaust path.
DOE guidance recommends keeping dryer duct runs as short and straight as practical and avoiding conditions that restrict the inside dimensions of the duct.
Common Dryer Vent Cleaning Mistakes
A few mistakes can make an otherwise simple maintenance job less effective.
Cleaning only the lint screen
The lint screen is important, but it does not clean the entire exhaust system.
Cleaning only the first few inches of duct
A visible opening can look clean while lint remains farther along the vent.
Ignoring the outside vent
A blockage at the exterior termination can restrict airflow even if the dryer-side connection is clean.
Pushing the dryer back too far
A clean duct can become crushed when the appliance is returned to its original position.
Using damaged or unsuitable ducting
Cleaning does not make defective duct material safe or appropriate.
Ignoring slow drying after cleaning
If drying remains unusually slow, investigate instead of repeatedly cleaning the same accessible section.
Working on a gas connection without the proper expertise
Gas-related work deserves a higher safety threshold. Use the owner's manual and qualified professional assistance when necessary.
Forgetting to reconnect the exhaust duct
Never operate the dryer with the exhaust connection improperly disconnected. NFPA specifically advises reconnecting the ducting to the dryer and outside vent before using the dryer again.
When Should You Call a Professional?
DIY cleaning makes sense when the vent is accessible, the equipment is in good condition, and you can safely follow the manufacturer's maintenance instructions.
Professional help becomes more appropriate when the situation goes beyond straightforward cleaning.
Consider calling a qualified professional if:
-
The vent runs a long distance through walls, ceilings, or other inaccessible areas.
-
You cannot safely access the complete duct.
-
The duct is damaged or needs replacement.
-
The vent configuration appears unusually complicated.
-
The dryer continues to dry slowly after accessible cleaning.
-
You suspect a blockage that your tools cannot reach.
-
The exterior termination is difficult or unsafe to access.
-
The dryer repeatedly reports an airflow restriction.
-
You are dealing with a gas connection or another issue outside routine vent cleaning.
-
You are unsure whether the appliance or the home's vent system is causing the problem.
A professional can also be useful when the problem is not simply accumulated lint. If the vent is clear but the dryer still performs poorly, the appliance itself may need diagnosis.
How to Prevent Dryer Vent Buildup
Good maintenance is easier than dealing with a heavily restricted exhaust system.
Start with the simplest habit: clean the lint screen regularly, generally after every load.
Also pay attention to changes in dryer performance.
If drying times gradually increase, do not wait for the dryer to stop working before checking the exhaust system.
Keep the area around the dryer clear and periodically inspect the visible duct connection. When the dryer is moved for cleaning, make sure it is returned without crushing or sharply bending the exhaust duct.
Check the exterior vent periodically for lint, leaves, nests, or other debris.
Finally, follow the maintenance instructions for your specific dryer. Manufacturer guidance can differ between models, so the owner's manual is the best source for model-specific procedures.
For broader laundry-appliance maintenance, KnowBrook's washing machine cleaning guide can help you keep the other major laundry appliance in the room on a regular cleaning schedule.
A Simple Dryer Vent Cleaning Checklist
Before considering the job finished, work through this checklist:
Conclusion
A clean dryer vent is about more than removing visible lint. The important part is keeping the entire exhaust path clear enough for the dryer to move air effectively and safely.
Start by recognizing the warning signs, especially unusually long drying times and poor exterior airflow. Then distinguish the lint screen from the exhaust system, safely access the dryer-side connection, remove accessible lint, inspect the exterior vent, and check the duct for damage or restrictions.
Do not rely on one universal cleaning schedule. Use the manufacturer's instructions, keep the lint screen clean, and pay attention to changes in dryer performance. Annual inspection and cleaning is a useful baseline supported by NFPA guidance, but some households may need attention sooner depending on use and conditions.
Most importantly, know where DIY maintenance ends. If the vent is inaccessible, damaged, persistently restricted, or connected to a gas-related problem you cannot safely handle, professional help is the better choice.
A dryer that dries normally with a clear, properly connected exhaust path is easier to maintain than one that is allowed to operate for months with a developing airflow problem.
Frequently asked questions
Can you clean a dryer vent without moving the dryer?
If moving the dryer is difficult or unsafe, some exterior vent cleaning may still be possible. However, accessing the dryer-side connection generally allows for a more complete inspection and cleaning. Follow the dryer's owner's manual, and do not attempt gas-line work yourself.
Why is my dryer still taking too long to dry after cleaning the vent?
A clean vent does not guarantee that every drying problem is solved. Check the lint filter, exhaust connection, exterior vent, and duct for remaining restrictions, damage, crushing, or other airflow problems. If the vent is clear but drying remains poor, the dryer itself may need further diagnosis.
Can you safely use a dryer if you suspect the vent is clogged?
A suspected restriction should be addressed rather than ignored. Warning signs such as unusually long drying times, excessive heat, burning odors, or poor airflow warrant stopping to investigate the exhaust system and following the manufacturer's safety instructions. If the cause is unclear or the system is difficult to access safely, professional inspection is appropriate.
Does a gas dryer require different precautions when cleaning its vent?
The vent-cleaning principles are similar, but gas dryers require additional caution around the gas connection. Do not treat vent cleaning as an opportunity to repair or modify a gas line. Follow the manufacturer's instructions and use a qualified professional for gas-line or connection work.
Does every dryer need an outside vent?
No. Conventional vented dryers exhaust air through a duct to the outdoors, while ventless or condensing dryers use a different system. Identify your dryer type and follow its manufacturer's maintenance instructions before using a conventional dryer-vent cleaning procedure.
What should I do if the outside dryer vent flap does not open properly?
1. The exterior vent should be able to open during dryer operation and should remain free of lint, debris, nests, and other obstructions. If airflow is weak or the flap does not operate normally, inspect the accessible exhaust path and address the restriction before continuing normal use.
Ethan Parker writes practical guides about home, everyday living, household decisions, consumer products, organization, and practical lifestyle topics. His work focuses on helping readers compare options, understand comm...