How to Find What's Taking Up Space on a Windows PC and Safely Free It
Learn how to check storage usage in Windows 11, find large files and apps, remove unnecessary files safely, and free up disk space without accidentally deleting important personal data. This guide also explains Storage Sense, OneDrive online-only files, Windows.old precautions, and what to check if your drive remains full.
In this article
- 1. Check How Much Storage Space Is Available
- Check storage in File Explorer
- Review the Storage settings page
- 2. Find the Files and Apps Using the Most Space
- Use Storage settings to investigate large categories
- Find large files with File Explorer
- Check installed applications
- 3. Choose the Safest Way to Free Up Disk Space
- Use Cleanup recommendations
- Use Storage Sense for ongoing maintenance
- Use Disk Cleanup when appropriate
- 4. Decide What to Delete, Move, or Keep
- Temporary files
- Downloads
- Recycle Bin
- Windows.old and previous installation files
- Unfamiliar system folders and files
- 5. Free Space Without Permanently Losing Personal Files
- Move files to another drive
- Use OneDrive Files On-Demand
- Change where new files are saved
- 6. What to Do If Your Drive Is Still Full
- Recheck the affected drive
- Check whether deleted files are still occupying storage
- Investigate recurring temporary-file problems
- Check Windows Update requirements
- Consider whether storage capacity is the underlying limitation
- 7. Verify the Cleanup and Prevent Future Storage Problems
- Confirm how much space you recovered
- Establish a simple maintenance routine
- Conclusion
When your Windows 11 PC runs low on storage, downloads may fail, updates may struggle to install, and saving new files can become difficult. The first step is not to delete everything you can find. It is to identify what is using your storage and decide which files can be removed, moved, or kept online without losing anything important.
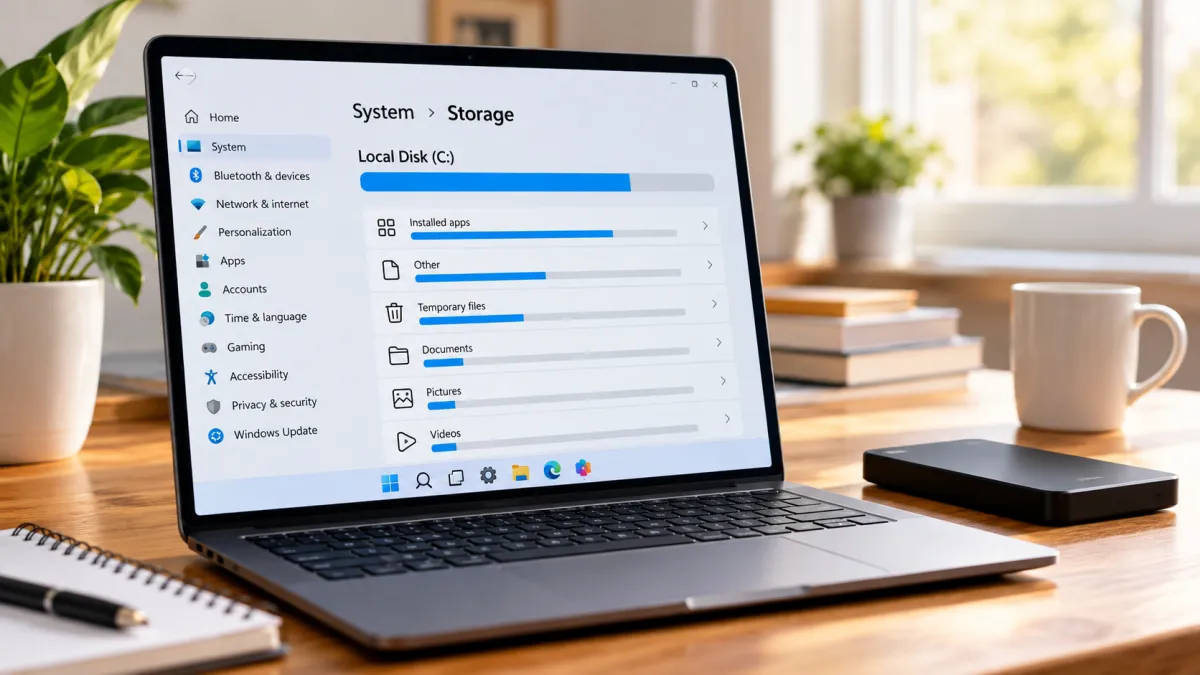
Windows includes several built-in tools that help you investigate storage usage and recover space. Start with Settings → System → Storage, review the categories consuming the most space, and then choose the appropriate cleanup method. This approach helps you avoid deleting personal files simply because they occupy a large amount of storage.
This guide explains how to find large files, use Windows cleanup features, handle downloads and cloud-synced files carefully, troubleshoot persistent low-space warnings, and prevent your drive from filling up again.
1. Check How Much Storage Space Is Available
Before removing files, check which drive is running low. Many Windows PCs use a primary drive labeled C:, but some computers have additional internal or external drives.
Check storage in File Explorer
-
Open File Explorer.
-
Select This PC in the navigation pane.
-
Find your drives under Devices and drives.
-
Review the storage bar and available-space information for each drive.
This gives you a quick overview of which drive needs attention. If C: is nearly full, focus first on that drive because Windows and many installed applications depend on it.
If another drive is low, inspect that drive instead. Cleaning C: will not necessarily solve a storage problem on D: or an external drive.
Review the Storage settings page
For a more detailed breakdown:
-
Open Start → Settings.
-
Select System.
-
Choose Storage.
-
Wait for Windows to calculate the storage categories.
Depending on your Windows version and device configuration, you may see categories such as installed apps, temporary files, documents, pictures, videos, and other storage.
These categories help narrow down the problem. For example, if installed apps account for a large share of your storage, removing unnecessary applications may be more effective than clearing browser data. If videos and documents dominate, reviewing large personal files may be the better option.
Do not assume the largest category is automatically safe to clean. The purpose of this first check is to identify where to investigate.
2. Find the Files and Apps Using the Most Space
After identifying the affected drive, look for the specific files, folders, or applications responsible for the storage usage.
Use Storage settings to investigate large categories
Select the category that appears to be consuming the most space. Windows may show more detailed information and available management options.
For example:
-
Installed apps: Review programs you no longer use.
-
Temporary files: Inspect the categories Windows identifies as removable.
-
Documents and videos: Look for large files you no longer need or can move elsewhere.
-
Other: Investigate further before removing anything because this category can contain different types of data.
The available categories and their descriptions may differ between Windows versions. Use the information displayed on your PC rather than relying on a fixed list of categories.
Find large files with File Explorer
You can also locate large files without installing a separate utility.
-
Open File Explorer.
-
Navigate to a folder you want to inspect, such as Downloads, Videos, or Documents.
-
Change the folder view to Details, if necessary.
-
Select the Size column to sort files by size when the column is available.
-
Review the largest files first.
If the folder contains many files, sorting by size can help you identify large video recordings, archived downloads, installation packages, or other items that may no longer be necessary.
Remember that a large file is not necessarily a useless file. A family video, work document, backup, or project archive may be important even if it occupies several gigabytes.
Before deleting anything, open the file when appropriate and confirm what it contains.
Check installed applications
If applications are taking up a significant amount of storage, open Settings and go to Apps → Installed apps. Review the applications listed there and use the available size information or sorting options where supported.
Consider removing software you recognize and no longer need. Avoid uninstalling unfamiliar programs simply because they appear large. Some applications support hardware, security, drivers, or other system functions.
Use the application's normal uninstall process rather than manually deleting its folders from Program Files.
3. Choose the Safest Way to Free Up Disk Space
Different storage problems require different solutions. Use this table to choose a starting point.
| What is using space? | Recommended approach | Main precaution |
|---|---|---|
| Temporary files | Review Windows cleanup options | Check selected categories before deleting |
| Unused applications | Uninstall through Windows Settings | Confirm the application is no longer needed |
| Large personal files | Delete unwanted files or move them elsewhere | Verify the contents before acting |
| Recycle Bin contents | Review and empty the Recycle Bin if appropriate | Emptying it removes those items from their normal recovery location |
| OneDrive files stored locally | Consider making eligible files online-only | Understand cloud availability and internet requirements |
| Previous Windows installation | Review whether rollback or old files are still needed | Removing it can remove the normal rollback option |
| Unfamiliar system files | Investigate before changing anything | Do not manually delete unknown Windows folders or files |
A useful rule is to choose the least destructive option that solves the problem. Removing an unnecessary temporary file is different from deleting a personal archive. Moving a video to an external drive is different from permanently deleting it.
Use Cleanup recommendations
Windows may provide Cleanup recommendations within the Storage settings area.
To check:
-
Open Settings.
-
Select System → Storage.
-
Look for Cleanup recommendations, if available.
-
Review the suggested categories and files.
-
Select only items you are comfortable removing.
-
Confirm the cleanup.
Depending on the PC and Windows configuration, recommendations may include temporary files, large or unused files, files synchronized with the cloud, or unused applications.
Treat these recommendations as a review tool, not as an instruction to remove everything. Read the category descriptions and inspect personal files before confirming deletion.
Use Storage Sense for ongoing maintenance
Storage Sense is a built-in Windows feature that can automatically manage certain storage cleanup tasks.
To review its settings:
-
Open Settings.
-
Select System → Storage.
-
Open Storage Sense.
-
Review the available cleanup options.
-
Adjust the settings to match your preferences.
Storage Sense can help manage eligible temporary files and Recycle Bin contents according to its configuration. Its behavior depends on the options enabled.
Be particularly careful with the Downloads folder. Do not assume Storage Sense will always leave it untouched, or that it will automatically remove every file you no longer need. Review the relevant settings before enabling or changing automatic cleanup.
Storage Sense primarily manages the Windows system drive, usually C:. If another drive is running low, inspect that drive separately.
Use Disk Cleanup when appropriate
Disk Cleanup is another Windows utility available on supported installations. It can provide options for removing certain temporary and system-related files.
To open it, search for Disk Cleanup from Start, select the appropriate drive, and review the categories offered.
If Windows provides an option to clean up system files, remember that some categories can affect recovery or rollback options. In particular, do not remove previous Windows installation files without first deciding whether you still need access to the previous installation.
Disk Cleanup is not a reason to delete unfamiliar files manually. Use the categories Windows presents and read their descriptions before proceeding.
4. Decide What to Delete, Move, or Keep
One of the most important parts of freeing storage is understanding the difference between removing a file and moving it somewhere else.
Temporary files
Temporary files can accumulate as Windows and applications perform their work. Windows cleanup tools identify categories that may be removable.
Review the selected items before confirming the cleanup. If Windows describes a category you do not understand, investigate it rather than selecting it automatically.
Avoid manually deleting random files from system directories. Use the built-in cleanup interface whenever possible.
Downloads
Your Downloads folder may contain old installers, duplicate files, documents, compressed archives, and other items you no longer need. It may also contain important receipts, work documents, photos, or files that are difficult to replace.
Open the folder and sort by size or date. Review the largest or oldest items first, and remove only those you recognize and no longer need.
If you want to keep a file but do not need it on your PC every day, move it to another suitable storage location instead of deleting it.
Recycle Bin
Deleting a file through File Explorer usually moves it to the Recycle Bin when applicable. Until the Recycle Bin is emptied, those files may continue to occupy storage.
Open the Recycle Bin and review its contents before emptying it. Restore anything you still need.
Emptying the Recycle Bin removes those items from their normal recovery location. Do not treat it as a harmless routine step if you have not reviewed what is inside.
Windows.old and previous installation files
After certain Windows upgrades, the system may retain files associated with the previous installation. These files can be useful if you need to retrieve something from the old installation or return to the previous Windows version.
Removing the previous installation can eliminate the normal rollback option. Microsoft generally provides a limited rollback period after an upgrade, often 10 days, but the available recovery options depend on the installation and device circumstances.
Before removing these files, ask yourself:
-
Do I need to retrieve any files from the previous installation?
-
Am I still considering returning to the previous Windows version?
-
Have I confirmed that my current installation and important personal files are working correctly?
If you are unsure, postpone the cleanup. Recovering a little space is not worth losing a recovery option you may still need.
Unfamiliar system folders and files
Do not delete a folder simply because it looks large or has an unfamiliar name. Windows, drivers, applications, and background services may depend on files that are not intended for manual removal.
If you cannot identify a file's purpose, leave it alone until you have verified what it does. Use Windows Settings or the application's official uninstall process for routine cleanup.
5. Free Space Without Permanently Losing Personal Files
You may not need to delete your personal files at all. Moving them or keeping eligible cloud files online-only can reduce the amount of local storage they use.
Move files to another drive
If your PC has a second drive with enough available space, you can move large files there.
For example, you might move a video archive or completed project from C: to another internal drive. You can also use an external drive if it has sufficient capacity.
A careful process is:
-
Identify the files you want to move.
-
Confirm the destination has enough free space.
-
Copy the files to the destination.
-
Open a few of the copied files to confirm they work.
-
Only then consider removing the original copies.
Copying first provides an additional opportunity to verify that the destination contains the files you intended to keep. For important documents, photos, and work files, consider maintaining a separate backup as well.
An external drive can help with storage capacity, but it is not automatically a backup if it contains the only remaining copy of your files.
Use OneDrive Files On-Demand
If you use OneDrive, Files On-Demand can help reduce the amount of local storage used by eligible cloud-synced files.
When a file is online-only, it remains in OneDrive while its full contents are not kept locally. You can generally download it again when you need it, but accessing it normally requires an internet connection.
For eligible files, you can use the available OneDrive option to Free up space. This is different from deleting the file.
Before using this feature:
-
Confirm the file is stored in the intended OneDrive account.
-
Make sure the file has synchronized successfully.
-
Understand that opening an online-only file generally requires connectivity.
-
Keep important files available offline when you know you will need them without internet access.
Files marked to always remain on the device may be treated differently by automatic storage management. Review the available OneDrive settings and file status before changing them.
Change where new files are saved
If C: repeatedly fills up while another drive has room, consider changing where new content is saved.
Depending on your Windows configuration, you can review Settings → System → Storage → Advanced storage settings → Where new content is saved.
Available choices depend on the type of content and the drives connected to your PC. Choose a destination that is reliably available and appropriate for the files being saved.
Do not redirect everything to a removable drive if you frequently disconnect it. Applications and files may become unavailable when the destination drive is not connected.
6. What to Do If Your Drive Is Still Full
If cleanup does not free enough space, or the low-space warning returns quickly, investigate the cause instead of repeating the same cleanup steps.
Recheck the affected drive
Open File Explorer → This PC and check the available space again. Then return to Settings → System → Storage to see which categories currently occupy the drive.
If a category remains unusually large, investigate that category. If free space drops again after restarting or using the PC for a while, look for files or applications that are continuing to grow.
Check whether deleted files are still occupying storage
Review the Recycle Bin and confirm whether files you intended to remove are still there.
Also check whether you moved files to another location or only copied them. Copying a file does not free the original drive's space until you decide what to do with the original.
For cloud files, distinguish between deleting a file and making it online-only. These actions have different effects.
Investigate recurring temporary-file problems
If Windows repeatedly reports low disk space, ordinary cleanup may not be the whole solution. A particular application, update process, or system issue could be contributing.
Microsoft documents some low-space troubleshooting scenarios involving temporary files and Microsoft Store-related cache or package files. In certain cases, Microsoft recommends steps such as running wsreset.exe to reset the Microsoft Store cache or using the relevant Windows troubleshooters.
These steps are not a universal fix for every low-storage problem. First inspect the storage categories and the exact warning you receive. Use official Microsoft troubleshooting instructions that match your situation rather than deleting application or system files manually.
Check Windows Update requirements
If the immediate problem is a failed Windows update, read the specific error message and review Microsoft's current troubleshooting guidance. The storage needed can vary by update, device, and configuration, so there is no single free-space figure that applies to every situation.
Start by removing clearly unnecessary files, moving large personal files where appropriate, and reviewing supported cleanup options. If Windows offers an external-storage option for the update process, follow the requirements shown for your device.
Do not remove recovery files or unfamiliar system folders simply to satisfy a storage warning.
Consider whether storage capacity is the underlying limitation
Sometimes the problem is not a single collection of unnecessary files. Your regular workload may simply require more storage than the drive can comfortably provide.
If you repeatedly run out of space despite reviewing files, removing unused applications, and using suitable cleanup tools, consider whether a larger internal drive or a different storage arrangement would better fit your needs. Any hardware decision should account for compatibility, backup needs, and the type of files you regularly use.
For broader guidance on that decision, see How to Know If Your PC Needs an Upgrade or a Replacement.
7. Verify the Cleanup and Prevent Future Storage Problems
After completing a cleanup, verify the result rather than assuming it worked.
Confirm how much space you recovered
-
Open File Explorer.
-
Select This PC.
-
Check the available space on the drive you cleaned.
-
Return to Settings → System → Storage if you need to investigate remaining usage.
Check again after each major cleanup step. This makes it easier to understand which action actually helped.
If the available space has barely changed, the selected files may have been small, the cleanup may not have completed, or another category may be consuming most of the drive.
Establish a simple maintenance routine
You do not need to inspect every file every day. A periodic review can help you spot storage problems before they interfere with updates or normal use.
A practical routine includes:
-
Reviewing the Storage settings page when free space becomes limited.
-
Checking Downloads for installers and files you no longer need.
-
Removing applications you recognize and no longer use.
-
Reviewing the Recycle Bin before emptying it.
-
Checking Storage Sense settings so automatic cleanup matches your preferences.
-
Moving large personal files to an appropriate destination when local access is not essential.
-
Keeping backups of important files rather than relying on a single copy.
The best routine is one you understand and can maintain without risking important data.
Conclusion
The safest way to free up disk space on Windows 11 is to identify what is using the storage first, then choose a cleanup method that matches the files involved.
Start with This PC and Settings → System → Storage. Investigate large categories, review files before deleting them, and use Windows cleanup tools for the tasks they are designed to handle. Move personal files when you want to keep them, and understand the difference between making OneDrive files online-only and deleting them.
If your drive remains full, investigate what is consuming space rather than repeatedly deleting files at random. Confirm the available space after cleanup, and use a simple maintenance routine to keep storage manageable without putting important documents or recovery options at risk.
Frequently asked questions
1. Is it safe to delete temporary files in Windows 11?
Many temporary files identified by Windows cleanup tools can be removed safely, but review the selected categories before confirming. Save your work and avoid manually deleting unfamiliar files from Windows system folders.
2. Does Storage Sense delete files in the Downloads folder?
Not by default. Storage Sense can be configured to manage the Downloads folder, so check its settings before enabling or changing automatic cleanup. Review files you want to keep before allowing deletion.
3. Is it safe to delete the Windows.old folder?
Deleting the previous Windows installation can remove your normal option to roll back to the previous version of Windows. Check whether you need files from the previous installation or still want the rollback option before removing it.
4. Does making OneDrive files online-only delete them?
No. Making a OneDrive file online-only removes its locally stored copy while keeping the file in OneDrive. You generally need an internet connection to download it again. This is different from deleting a synced file, which can also remove it from other synced locations.
5. Why does my Windows 11 drive keep filling up after cleanup?
Possible causes include growing downloads, installed apps, temporary files, Recycle Bin contents, cloud files stored locally, or new files being saved to the same drive. Recheck Settings → System → Storage to identify which category is growing before choosing another cleanup step.
6. Does Storage Sense clean every drive on my computer?
Storage Sense primarily manages the Windows system drive, usually C:. To inspect other drives, check Settings → System → Storage → Advanced storage settings → Storage used on other drives. Available options may vary by Windows version and configuration.

Maya Thompson writes practical technology content covering consumer technology, software, online services, digital tools, cybersecurity basics, and everyday technology decisions. She focuses on explaining technical topic...